JSUnit Widget
Installation
easy_install tw.jsunit
Usage
The JSUnit Widget can be used to create testpages for testing javascript code using the JSUnit javascript unit testing framework. The package also includes a Runner Widget that sets up the environment for running the JSUnit testRunner off a TurboGears webapp as seen in the online testRunner example.
The tutorial is divided into two parts. The first part demonstrates the usage in testing custom javascript code used in a TurboGears Application and the second part demonstrates the usage in testing javascript code in a ToscaWidget.
Testing Javascript Code in A TurboGears App
When testing javascript code in a TG app, the JSUnit widget can be used by creating two additional controller methods. One for running the testRunner and the other for loading the testsuite. The method for running the testRunner must instantiate and place the Runner widget in the template context. Similarly the method for loading the testsuite must instantiate the JSUnit widget. The following code block shows the usage:
from tw.jsunit import JSUnit, Runner

class RootController(BaseController):

    @expose('samplejsunit.templates.runner')
    def runner(self, **kw):
        pylons.c.runner = Runner(testpage='/runpage')
        return dict()

    @expose('samplejsunit.templates.runpage')
    def runpage(self, **kw):
        pylons.c.jsunit = JSUnit()
        return dict()
We also need to create two templates. One for the testRunner and one for the testsuite. The template for the testRunner should include the runner widget:
${tmpl_context.runner(value=value)}
The template for the testsuite should include the JSUnit widget and the javascript file containing the test functions. It should also include javascript files where the functions to be tested are defined:
<script type="text/javascript" src="/javascript/myfunctions.js" />
<script type="text/javascript" src="/javascript/mytests.js" />
${tmpl_context.jsunit(value=value)}
The javascript files are typically placed in the public/javascript folder inside the package for the TG app. The mytests.js file would contain all the test functions having the test signature as described in the jsunit documentation. These functions should be called testXXX() and should not take any parameters. The following example shows some sample test functions:
function testAlwaysPasses() {
  assertEquals("Always Passes!", 1, 1);
}

function testNeverFails() {
  assertNotEquals("Never Fails!", 1, 0);
}

function testSometimesFails() {
  var rand_no = Math.ceil(Math.random()*10);
  assertEquals("Sometimes Fails!", true, rand_no>5);
}
Pointing the browser to http://localhost:8080/runner shows up the test runner page. The tests are performed on hitting the Run button. The results are displayed nicely as shown below:

The final files for this tutorial can be downloaded here;
- ZIP file: SampleJSUnit.zip
- Tar/Bz2 file: SampleJSUnit.tar.bz2
Testing Javascript Code in ToscaWidgets
For testing javascript code in ToscaWidgets, the package for the widget to be tested should include a Test Widget created by extending the JSUnit widget. The following example shows a new widget ItemSelectorTest created inside the tw.extjs package for testing the javascript code used in the ExtJS ItemSelector widget. Apart from the javascript test code the Widget should include all the javascript code which are required to be tested:
from tw.api import Widget, JSLink, CSSLink, JSSource
from tw.core.resources import Resource

from tw.jsunit import JSUnit
from tw.extjs import all_debug as all

multiselect_js = JSLink(modname=__name__, filename='static/Multiselect.js')
ddview_js = JSLink(modname=__name__, filename='static/DDView.js')
test_js = JSLink(modname=__name__, filename='static/multiselect_test.js')

class ItemSelectorTest(JSUnit):

    def __init__(self, *args, **kw):
        super(ItemSelectorTest, self).__init__(*args, **kw)
        self.javascript.append(all);
        self.javascript.append(multiselect_js);
        self.javascript.append(ddview_js);
        self.javascript.append(test_js);

    def update_params(self, d):
        super(ItemSelectorTest, self).update_params(d)
The file multiselect_test.js inside the static folder contains the test functions having the test signatures described in the jsunit documentation. The following code block shows some example functions. The setUp() function is used to setup the test data. In this case only a part of the function definition code is displayed:
function setUp() {

    ....
    ....

    formItemSelector = new Ext.form.FormPanel({
        labelWidth:40,
        width:550,
        url:"/save",
        items:panelItem,
        buttons:[buttonSave, buttonReset]
    });
formItemSelector.render("item_selector_div");

}

function testURL() {
  assertNaN("URL should be a string!", formItemSelector.url);
  assertEquals("URL value mismatch!", "/save", formItemSelector.url);
}

function testXtype() {
  assertNaN("xtype should be a string!", panelItem.xtype);
  assertEquals("xtype value mismatch!", 'itemselector', panelItem.xtype);
}

function testFieldLabel() {
  assertNaN("fieldLabel should be a string!", panelItem.fieldLabel);
  assertEquals("fieldLabel value mismatch!", 'States', panelItem.fieldLabel);
}

function testMsWidth() {
  assertNotNaN("msWidth should be an integer!", panelItem.msWidth);
  assertEquals("msWidth value mismatch!", 200, panelItem.msWidth);
}

function testMsHeight() {
  assertNotNaN("msHeight should be an integer!", panelItem.msHeight);
  assertEquals("msHeight value mismatch!", 200, panelItem.msHeight);
}

function testValueField() {
  assertNaN("valueField should be a string!", panelItem.valueField);
  assertEquals("valueField value mismatch!", 'code', panelItem.valueField);
}
This javascript code can be tested by using the Runner widget inside a sample TG app. As described above, the Controller should have two methods, one for the testRunner and the other for the testsuite. The method for the runner should be the same as above. In this case, apart from the Runner widget, two more widgets needs to be instantiated, viz. the widget to be tested and the test widget. Both these widgets should be placed in the template context by the testsuite method. The following code block demonstrates the usage:
from tw.extjs.tests import ItemSelectorTest
from tw.jsunit import Runner, JSUnit

runner = Runner(testpage='/itemselectortest')
selectortest = ItemSelectorTest()

class RootController(BaseController):

    @expose('sampleunit.templates.runner')
    def runner(self, **kw):
        pylons.c.runner = runner
        return dict()

    @expose('sampleunit.templates.itemselectortest')
    def itemselectortest(self, **kw):
        pylons.c.selectortest = selectortest
        return dict()
The template file for the runner method should include the Runner widget as follows:
${tmpl_context.runner(value=value)}
The template file for the testsuite method should include the test widget:
${tmpl_context.selectortest(value=value)}
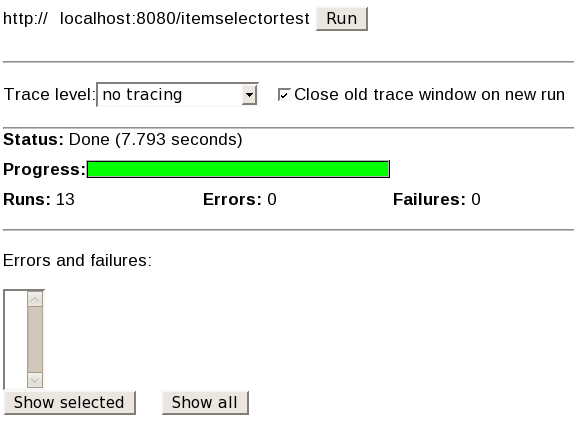
Pointing the browser to http://localhost:8080/runner shows up the test runner page. The tests are performed on hitting the Run button. The results are displayed nicely as shown below:
The final files for this tutorial can be downloaded here;
- ZIP file: SampleUnit.zip
- Tar/Bz2 file: SampleUnit.tar.bz2